Thursday, July 31, 2014

Comparison Thursday: OPI Bright Pink Cremes

Today is my blog's birthday!!!!!!!!  Wishes of a Blue-Eyed Girl has turned 2!  I want to express a huge thank you to all of you lovely readers who follow my little blog.  I'm not a funny blogger, and my nails and skin aren't the bestest of the best, but I try hard to be informative so you know exactly what you'll get before you buy!  In honor of this auspicious occasion, I am hosting a giveaway of my favorite polishes!  


There will be twelve winners, and each person will receive one of the "favorites" plus the new Blue-Eyed Girl Lacquer Special Edition, Terrific Twos (thanks to Jessica, Sara, and MJ for the help naming it!).  To enter, fill out the prompts in the rafflecopter below.  PLEASE REMEMBER TO ACTUALLY DO THE THINGS YOU SAID YOU'VE DONE!  I do check, and I'd hate for you to be disqualified because you unliked someone or you didn't post something publicly!  If I can't see it, then it doesn't count!  All polishes in this giveaway were purchased by me (except for Maui Wowee which was an extra with my order).  Thank you again to everyone for all of your support!  Good luck!

a Rafflecopter giveaway


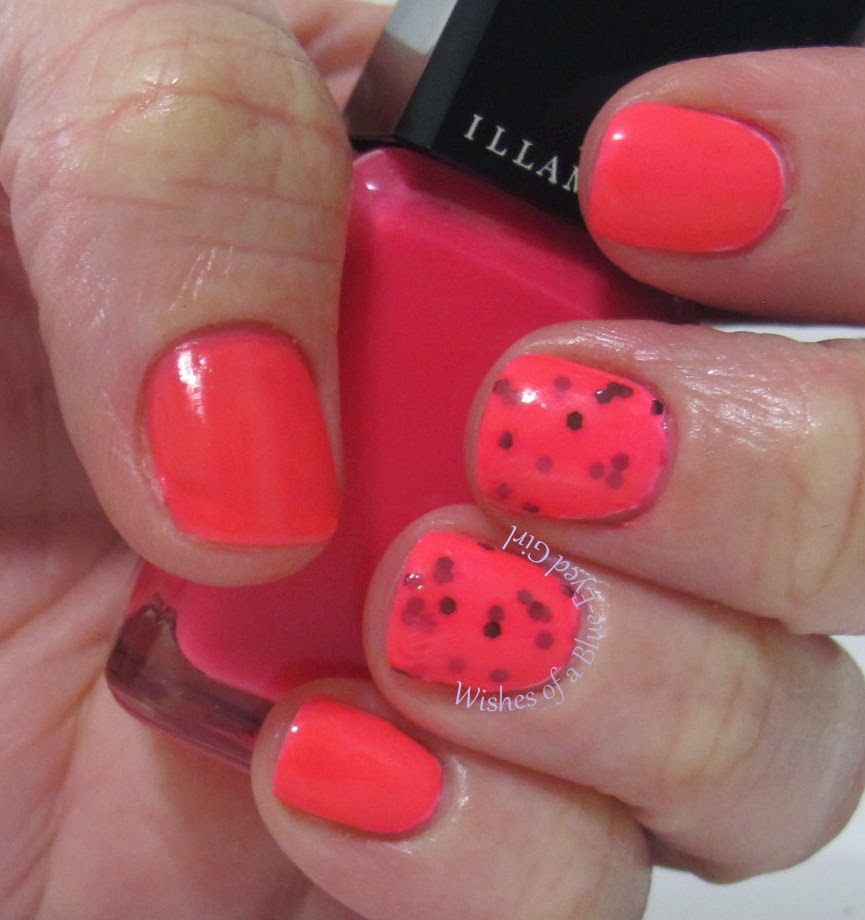
Ok, now we can get back to our regularly scheduled program!  As soon as the Gwen Stefani collection by OPI came out, I wanted to know - how does Hey Baby compare to another popular OPI, Strawberry Margarita?  I didn't own Strawberry Margarita, but people were claiming that it and Hey Baby were exact dupes.  Clearly, that necessisitated me purchasing SM for my weekly comparisons!  So, let's get down to business!

[I purchased both of these myself.]


Because there's not really a whole lot to these polishes, there are really only two similarities between them - the base color and the creme finish.  There aren't that many differences, either, really, so this will be a bit of a shorter post.  However, I wanted to do a comparison of these two anyway because so many people claimed that they were exact duplicates.  I can definitively state that they are not exact duplicates, but they are very close!  Let's get to the differences.  In the bottle, they look almost indistinguishable, but you'll see that isn't the case on the nail.  
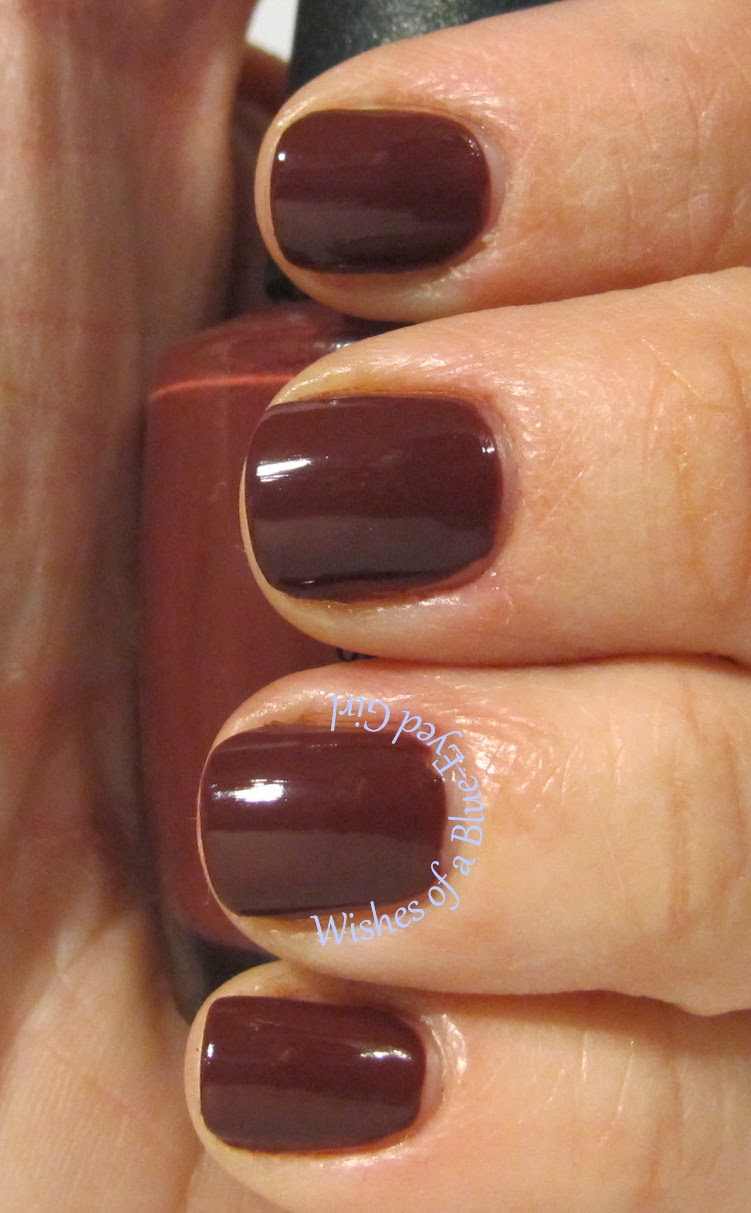

Hey Baby


Hey Baby was amazing to apply, and I didn't need much cleanup at all.  The formula was thicker thank SM, which means that it could have been a one coater.  I chose to do two coats, though, to ensure that there weren't any patches or bald spots in my photos.  It is slightly darker in hue than SM.  I didn't use topcoats on either of these because Hey Baby is touted as a "Creme Gloss," and I wanted to see what that meant.  As you can see from my photos, it has the exact same finish as SM, and neither of them are super glossy.  Without using a quick dry topcoat, it did take longer to dry than I'm used to.


Strawberry Margarita


SM is a bit more watery than Hey Baby.  You could still see my nail line with the first coat, and I needed three coats for full opacity.  The consistency could make it a little more prone to flooding my cuticles if I wasn't careful, but it wasn't so bad that I needed to be super careful.  SM is ever so slightly brighter in hue than Hey Baby.  Again, I wore this without topcoat, so dry time was on the long side.  It's also not very glossy without topcoat, so I definitely prefer it with a glossy topcoat.


So, which do you like better?  For me, I fell in love with the application of Hey Baby, which was the overarching factor in my decision to keep it over SM.  Honestly, they aren't exact duplicates, but they are so close in color that you truly don't need both of them.

[I purchased both of these myself.]

Wednesday, July 30, 2014

Summer of Untrieds: Week 3

Another week down, and only one more day left for the Summer of Untrieds challenge!  Without anymore preamble,let's get to week 3's polishes!

Here are the prompts and the rules:


Rules:


  • Use at least 1 untried polish that fits with the prompt for the day.
  • If you don't have anything that works with the prompt, then consider it a free day and choose a random untried from your stash.
  • There won't be an inlinkz, so keep up with the group by tagging your photos #summerofuntrieds.  I've also been including #julyuntriedchallenge in my posts, so you can add that too if you want.  Also, feel free to add a tag to me if you'd like (either @blueeyedlawyer or #wishesofablueeyedgirl).
  • Start crossing off those untrieds in your stash!
[I purchased these polishes or received them as gifts from friends.]

July 15: Pink


For pink I chose to use Zoya Kitridge, Peita's Polish Pinkaholic, Accessorize Lilac Sorbet, and Lilypad Lacquer Bubble Yummo.  Kitridge went on smoothly and easily without streaking and built well in three coats.  I chose to top this baby pink with the vibrant neon Pinkaholic, which was also easy to apply with the glitters coming out and spreading easily.  I did a watermarble using Lilac Sorbet, Kitridge, and Bubble Yummo over a coat of Cult Nails Tempest.  This is probably the best watermarble I've ever done in my life, and I'm super proud of how it came out!  All three of these polishes were easy to marble with, and I can't wait to wear Lilac and Bubble Yummo on their own.

July 16: Flakie


I decided to try something different for my flakie manicure, and I wasn't in love with the outcome.  Someone told me that it looked like mermaid scales, which made me feel a little better about them, though.  I used OPI's Amazon... Amazoff, which applied easily but stained just a little bit on the accent nail that had all of the flakies combined.  I used Finger Paints flakies from a few years ago (from thumb to pinkie): Asylum, Flashy, Flecked, all 4,and Motley.  The flakies were easy to use, but I wouldn't recommend layering them over each other unless you've got some time to wait for them to dry!

July 17: Elevation Polish


The EvPs I chose to wear were Higravstinden and Haba Xueshan.  I was hoping these two would look nice together, and they really did!  The mint accents of Haba on top really pulled the look together nicely.  Hig applied well and in only two coats, but it had a bit of staining on my nails upon removal.  The blue shimmer in Hig isn't as noticeable in my photos, but it's very clear in person.  Haba was also easy to apply, and the glitters came out and spread across my nails easily.

July 18: Green


I feel like I have a million green Enchanted Polishes that I haven't worn, which I admit is probably an exaggeration, so I went with two of those for this prompt.  I used July 2013 topped with Wish Me Good Luck.  July was amazing!  It applied so well and could've been a one coater, but I chose to do two to ensure no bald spots in my photos.  The pink shimmer in it is striking, but I couldn't get a photo of it to save my life.  In person, however, it's extremely evident in the bottle as well as on the nail.  WMGL was a pain in the butt.  Application was difficult as the glitter to base ratio pulled heavily in favor of base.  The glitters were difficult to extract from the bottle, and if you tried to get enough glitter on the brush you'd end up flooding your cuticles because there was too much base.  All in all, I wasn't really in love with this mani despite the fact that I adore July.

July 19: Neon Glitter


I always love the look of neon over pastels, so I knew I just had to do Enchanted Polish *69 over something light.  I looked around my stash and was afraid that I didn't have anything untried that would work, and then I remembered my bottle of Enchanted J'adore!  This dainty pink was thin, a bit watery, and applied with some streaking and frostiness.  Thus, wearing it as undies for *69 was the perfect use for it!  I used three coats of J'Adore with one coat of *69, which is a lovely neon green and pink glitter topper with a shimmered base.  I have a decant, so I can't really speak to the polish's application truthfully since I was using a mini bottle.  However, in the mini bottle, everything came out alright and very easily and spread without much manipulation.  I was pretty disappointed with J'Adore, though, because the holo effect was practically nil, and even with three coats, I could still easily see my nail line.  It's not at all like the other EP holos I own.

July 20: Duo/Multichrome or Shifter


I received a couple decants of the I <3 Nail Polish chromes, Cygnus Loop and Birefringence, from a friend to try out before I took the plunge in purchasing them myself.  I'm really glad she let me try them because it helped me realize that I don't really need more than a decant.  While the end effect is lovely and the shifts are gorgeous, I just didn't love them.  Plus, they both had the same base color, which made differentiation a bit difficult.  As you can see, I was able to easily smudge two of my nails even though I had used a coat of KBShimmer's Clearly on Top at least five minutes or longer before the smudges occurred.  I don't like polishes that don't dry quickly on me, so these two were nice to try, but I probably wouldn't buy full sizes of either of them.  Plus, they're so similar to the million of other, cheaper, chromes out there, that I just can't justify spending that type of money on a bottle or two of something I can get for much cheaper (and that could be better quality!).  I can't really speak to their application because I used the mini bottles, but I will say that they were a pain to apply from the mini bottles leaving bald spots and streaks with not-so-careful application.  Keep in mind that could be because the mini brushes are annoying to use.

July 21: Girly Bits


My mani for Girly Bits kind of reminded me of Christmas in July with the rich green and dark maroonish red.  I only had two Girly Bits polishes I hadn't used yet, Fathomless and What Happens in Vegas Ends Up on Facebook, so I decided to wear them together!  What Happens in Vegas Ends Up on Facebook is a lovely maroon scattered holographic with a pretty dense smattering of blue iridescent glitters.  Application was super easy, and the rainbow effect was really nice with the bits of iridescent peeking out.  Fathomless is a dark hunter green with silver micro glitters.  Again, application was great, and it only really needed two coats for full opacity.  Here, however, I used three for photo purposes.  Dry time for both was average.  

July 22: Teal


For my teal mani, I decided to cheat and do skittles using five different teals.  Is that really cheating, though?  I'm going to pretend like it's not since I did wear all five of these for over 24 hours.  From my thumb to pinkie I wore: Elevation Polish Arabian Sea 2 (a light teal with gold flakies), Lilypad Lacquer Neon Ocean Lights (a medium teal holographic with a super strong pink/purple flash), Lynnderella Do You Paraiba? (a medium teal micro glitter), Elevation Polish Twinkle in Yeti's Eye (a darker teal with a green to red shift), and Enchanted Polish August 2013 (a dark teal linear holo).  All of these guys applied amazingly, and I don't have a single complaint about any of them.  I wore three coats of them all except Paraiba and August, which only needed two coats.  Dry time on them all was quick.

So, what do you think?  Are you playing along still?  I think this is the first nail challenge I've done every single prompt for through completion!  I've gotten through an outstanding number of untrieds, so I think I'll be bringing it back again in October!  What do you think?  Do you like doing challenges like this?

[I purchased these polishes or received them as gifts from friends.]

Tuesday, July 29, 2014

Pretty Little Liars: Rainbow Honey Sample and Annual Emotion


Tonight's post is going to be a combo just like last week's where I combine both my #RedCoatTuesday post with a Summer of Untrieds post!  As per my usual, I haven't seen tonight's episode and won't be able to until sometime tomorrow or later tonight, so no spoilers please!  Today's Summer of Untrieds theme was Rainbow Honey, and I chose a red polish, fortuitously apparently, that also doubles as my Pretty Little Liars Mani!  So, let's get to it, then!


The rules are easy!
  • Paint your nails red, do your lips red, do a shadow design in red, or do anything beauty related that is mostly red.
  • Add your blog and photo to the inlinkz!  If you don't have a blog but do have an IG, you can check this link for directions on how to use your IG for inlinkz.  If you don't have a blog or IG, you can just add your photo to the linkup or send it to Color Me So Crazy, and she will get them up for you!
  • Use the #RedCoatTuesday tag when you share your photos on IG, Twitter, or Facebook!
For the Rainbow Honey challenge, I chose an unnamed sample I received from a random blog sale and Annual Emotion, which came out last December.  I got bored easily with the plain silver foil, though, so I went ahead and added some stars using @Teismom's Nail Vinyls.


The unnamed sample polish is a cherry red with red and silver micro-flakies with bits of silver holo particles.  It built up very easily in two coats, and I didn't need to use any extra topcoat to help smooth down errant glitters.  Dry time was pretty average even using a coat of KBShimmer's Clearly on Top.  


The particles came out of the bottle easily and spread across the nail without needing the dab method or other placement.  The consistency wasn't bad, as it wasn't too thick nor too thin.  I didn't need to add in any thinner, which happens often for me with Rainbow Honey polishes.  The consistency stayed nice and fluid the whole time I did my mani without any further thickening or clumping.  Application was easy and didn't require cleanup at all.


Annual Emotion is a silver foil with a touch of linear holo in the base.  The first coat covered pretty well, but it's definitely one of those polishes that you need to carefully apply or it will drag and bald.  Make sure you wait until each coat is dry before you apply the next coat.  I ended up using three coats to ensure there weren't any bald spots in my photos.  Otherwise, the consistency was a bit more fluid than the sample, and required a bit more cleanup.  Dry time was average between coats and was fairly quick with a coat of KBShimmer's Clearly on Top.


The Nail Vinyls were easy to apply, but make sure your polish is completely dry before you use them.  I always make the mistake of trying to use them before my polish is dry and, inevitably, have to redo at least one nail.  Someone in one of my Facebook groups recommended taking the vinyl and pressing it on my palm once or twice before applying it to my nail, and that helped me keep the stickers from pulling up my polish too badly.  I used one coat of the sample over the vinyls and quickly removed the stickers so the fresh paint wouldn't stick to the stencils when I removed them. 


I really like how unique these polishes are in my collection.  The silver holo is the only one I own that's more foil than holo, and I wish that the holo was a bit stronger even in the sunlight.  The flakies in the sample were dense without looking cluttered.  All in all, I truly enjoyed the look of this mani!  


You can purchase Rainbow Honey polishes at their store.  Follow them on Facebook, Instagram, and Twitter for news and updates.


(Source)

Friday, July 25, 2014

Summer of Untrieds Week 2

I've been sooo busy at work and with the shop that I haven't had time to keep up with the Summer of Untrieds Challenge posts.  I've been doing them every day and posting them on my Instagram account, but I haven't posted them here.  That being said, I'll be playing a little catch up the next few days!  So, let's get started!

Here are the prompts and the rules:


Rules:


  • Use at least 1 untried polish that fits with the prompt for the day.
  • If you don't have anything that works with the prompt, then consider it a free day and choose a random untried from your stash.
  • There won't be an inlinkz, so keep up with the group by tagging your photos #summerofuntrieds.  I've also been including #julyuntriedchallenge in my posts, so you can add that too if you want.  Also, feel free to add a tag to me if you'd like (either @blueeyedlawyer or #wishesofablueeyedgirl).
  • Start crossing off those untrieds in your stash!

July 8: Glitter with Colored Base

I wore NerdLacquer Warrior Ethos with an accent of Alter Ego's Nymph of the Night.  I did this for a #RedCoatTuesday, so go and check out the full post here.


July 9: Lilypad Lacquer


I wore Violet Moon and Almost Famous on alternating nails.  I loved these two together, and they both applied flawlessly.  They both had pink flashes that really brought the look together, which is why I wore them both.  However, sadly, the pink flash in Violet Moon was impossible to pick up with my camera, but it's very apparent in person.  Both polishes only took three coats and dried quickly.  I purchased these directly from Lilypad Lacquer at her store here.


July 10: Purple


This is Peita's Polish Wendy with accents of Lynnderella Is it Warm In Here?  Wendy is a warmed toned purple with a strong pink flash.  It applied very easily in only two coats, and dried quickly with a coat of KBShimmer's Clearly on Top.  It removed without staining, too, which is sometimes an issue for me with purples.  IiWiH is a clear base with a strong purple shimmer loaded with matte glitters in white and neons.  It wasn't that hard to get the glitters out of the bottle, and the consistency was nice with even application.  I purchased both of these straight from the makers: Peita's Polish and Lynnderella.


July 11: Summer


For my summer themed polish, I used a few polishes whose names, and colors, reminded me of summer.  I used Model City Polish Walking on Sunshine, a sunny yellow holo, and OPI Strawberry Margarita, a bright pink creme, as base colors and topped with Lacquistry's Watermelon Baller Shot Caller, a glitter topcoat packed full of shades of pink, green, and black matte glitters.  Strawberry Margarita took three coats for full coverage and dried fairly quickly.  It applied evenly and didn't require much cleanup.  Walking on Sunshine is in four coats as it is a tad sheer.  Application was fairly easy, and the patchy first coat builds up well with further coats.  Watermelon Baller is one coat with a great glitter to base ratio.  The glitters were easy to get out of the bottle and spread well.  You can purchase OPI polishes at salons and beauty supply shops.  You can purchase Model City Polish here and Lacquistry here.


July 12: Glitter Crelly


The glitter crelly I chose to wear, 365 Days of Color's Summer Dream, was from my friend Jen over at Jen's Nail Files who gave it to me in my birthday group!  I chose to pair it with Elevation Polish Lys Glacier.  Summer Dream is a minty green crelly with a lovely rainbow of hex glitters in varying sizes.  I wore three coats without undies, and it applied fairly easily, if not a tad thick.  Lys Glacier is a taupe-ish purple with a pink to gold shifting shimmer.  I wore three coats alone, and it was super easy to apply.  Sadly, 365 Days of Color has decided to stop selling nail polish so she can focus on her insanely popular (and super awesome) hand care line, but you should still check her out at her store here.  Lys Glacier has been discontinued, but you can purchase other EvPs at her store here.


July 13: China Glaze


I chose to wear varying shades of blue for my China Glaze mani, so I chose Strap on Your Moon Boots with accents of Kaleidoscope Him Out.  I know that the Hologlam collection was a huge disappointment for a lot of people who were hoping that the recent China Glaze collection would be an answer to the hugely popular and long discontinued OMG collection.  There were clearly batch issues as several people had bottles with very little holographic pigment.  I, however, received a set with very high holographic pigmentation as you can see in this photograph.  I used three horrible coats of SOYMB to cover up the patches and balding spots.  It is pigmented enough to be opaque in one or two coats, but the application was so horrible that I was forced to use three coats to cover up the unevenness.  You can see in my photos, that it was also extremely difficult to clean up, and there were still stains on my cuticles after I did my cleanup routine.  My bottle of KHO was from a dusty hunt, so it's old and a bit thick.  I used three coats of KHO because it was actually fairly sheer.  Cleanup was relatively easy as well.  Both of these have been discontinued, but you can purchase China Glaze polishes at beauty supply stores.


July 14: Neon


It's hard to get much more neon than Illamasqua's Collide.  I decided to pair Collide with a special franken from a friend that I received in a indie maker/hobbyist group swap.  Collide is a bright neon pink polish that can be worn alone (on my thumb) or over white (on my index and pinkie).  Application was fairly easy, but it works much better in two coats over white versus four coats alone.  Even with the four coats, it was still relatively easy to see my nail line.  The little franken is a lovely neon pink with black glitters.  I wore this in two coats over Cult Nails Tempest.  You can purchase Illamasqua polishes at Sephora.

So, that was week two.  Which was your favorite?  Did you participate?  There's still one more week left to play, and I'd love to see your manis!

Thursday, July 24, 2014

Guest Comparison Thursday: My Life in Polish and Minty Holos

Tonight's guest post comes from the super sweet and awesome Sara from My Life in Polish!  When I put out the call for help, Sara answered quickly and even agreed to do a comparison for me!  I'm stoked that she was able to find some very lovely mint holos to compare for us tonight, and I'm even more excited that they aren't any that I own!  So, check out the lovely post below, and make sure you go give Sara some lovin!

Hey guys!  I'm Sara from My Life in Polish.  Super excited to be posting over here today.  When I asked Julie what kind of posts she was looking for she suggested a comparison.  So of course I immediately jumped to my love of minty holos.  I have an over abundance so this was a no brainer.


My index finger is Hit Polish Nail Lacquer Breakfast @ Tiffany's.  Two coats made it opaque but the formula was kind of a pain, little thick but runny at the same time.  Next in line is Liquid Sky Lacquer Mint to Love.  This is also two coats but the formula was hands down the best of the four.  So creamy and amazing!  My ring finger is Dollish Polish Totes Magotes.  Minty green and an awesome movie quote?  Yes please!  This is the only polish that took three coats.  Good formula though.  Lastly my pinky is NailNation 3000 Never Mint To Hurt You.  It's two coats and a nice creamy formula.


You can see that Totes Magotes is the most holo but by no means is it a freaky strong linear.  Hit Polish and NailNation had the softest holo effect.  The Dollish Polish and Liquid Sky Lacquer are my favorites.  DP because I like the base green color and LSL because it was the all around best polish of the bunch.

So now I ask you to enable me a bit.  What is your favorite minty green holo?  I obviously don't own enough haha (I have more not shown here).  Thanks for reading today and a huge thanks to Julie for letting me hang out here today.

Note from Julie: To answer Sara's question regarding favorite minty green holo - If I can be a bit biased here...  I'd have to say that it would be Blue-Eyed Girl Lacquer Dorkhead? You Slash Me with Your Words.  But then again, I don't have a ton of true mint holos (or like, any).  ;)

Tuesday, July 22, 2014

Pretty Little Liars: OPI Intl Date Line

Tonight's #RedCoatTuesday features a polish that I've had for years.  I can't remember when I got it, but it was either high school or early college, and I'm older than a lot of other bloggers, so that was a while ago.  So, first, let's check out the rules for Red Coat Tuesday!


The rules are easy!
  • Paint your nails red, do your lips red, do a shadow design in red, or do anything beauty related that is mostly red.
  • Add your blog and photo to the inlinkz!  If you don't have a blog but do have an IG, you can check this link for directions on how to use your IG for inlinkz.  If you don't have a blog or IG, you can just add your photo to the linkup or send it to Color Me So Crazy, and she will get them up for you!
  • Use the #RedCoatTuesday tag when you share your photos on IG, Twitter, or Facebook!

I purchased this polish myself.


Color:  deep burgundy red
Finish:  Crème – a flat polish that finishes smooth with full opacity.
Bottle / Brush:  OPI black label – a thinner brush used on the old OPI formula.  The wand for the brush is the standard OPI length.  This brush gives better control than the newer wide brushes.


Opacity:  High – opaque at two coats!
Glitter Application:  N/A


Consistency:  Medium – applies easily and doesn’t flood the cuticles.
Overall Ease of Application:  Easy – applies well without pooling, dragging, streaking, or balding.  Spreads evenly and smoothly.


Stampability:  Not tested for stamping.
Dry Time:  Medium – dry to the touch with minimal smudging in 3-8 minutes. 


Overall Thoughts:  While it's been a long time since I've worn this polish or took these photos, I do know that this polish is one that applies so easily and lasts for quite some time.  My body chemistry really likes OPI black label polishes, so Intl Date Line tended to last on me for up to 4 days or longer without much wear.  It's always refreshing to wear a creme by itself without anything else to mar the fresh and even finish.  While there's nothing uber remarkable about Intl Date Line, it's still a fairly nice polish if you like darker reds.  For me, while the application was nice, I just didn't love the color.  It was too ruddy for me, so I sold it.  Now, I'm sad that I did simply because of the nostalgia factor, but nostalgia is no reason to hold onto things you don't use anymore!  Especially when others would enjoy it more!

This is an older polish that's pretty hard to find, but you can occasionally find it on blog sales or on dusty hunts.  Otherwise, you can purchase OPI products at beauty supply stores, like Ulta or Sally's, or Salons.

I purchased this polish myself.

(Source)