Friday, February 28, 2014

Comparison Friday: Dainty Purple Glitter Crellies

Topnight's going to be a super super short comparison post as I'm currently working on getting orders together, which is yay!  So, tonight we're going to take a look at Jindie Nails Princess Bubblegum and Model City Polish Fairy Fight.

Princess Bubblegum was sent for my honest review and Fairy Fight was from an even swap with the maker.


As you can see, both are a dainty shade of lilac, both have pink, blue, and purple micro glitters, but that's about where the similarities end.


Fairy Fight


Fairy Fight has micro-fine glitters all the same size that are super reflective, which gives the base a bit of a shimmer effect.  The base color is a few shades darker and more purple than PB, and there aren't any iridescent glitters.  This is two coats with one coat of KBShimmer's Clearly on Top.  Application was beyond easy, there was little to no cleanup, and a quick dry time.  You can pick up Model City Polishes from the lovely Nina here.  Follow her on Facebook and IG for news and updates on new releases.


Princess Bubblegum


Princess Bubblegum leans a bit more pink than purple on the lilac scale.  The glitters are more varied in size and includes neon matte glitters versus the shimmer-like glitters you find in Fairy Fight.  PB also has various shapes and sizes of iridescent glitters that aren't found in FF.  Application was also very easy for PB, and there wasn't much cleanup.  This is also two coats with one coat of KBShimmer Clearly on Top.  You can purchase Jindie Nails polishes at her store.  Follow her on Facebook and IG for news on new polishes and restocks.


So, what do you think?  I think they're clearly different enough to have both, and that's what I've done!  I'll have proper reviews of both up next week.

Thursday, February 27, 2014

Golden Oldies Thursday: Orange

If you've been reading for a while, you'll know that I am not the biggest orange fan.  Out of my entire collection, I have maybe only ten or so oranges?  So, when this challenge came up, it was inevitable that I'd be re-wearing a polish I've already reviewed on the blog before.  That being said, I decided to put on my favorite mainstream orange, Zoya Myrta.  Teeeeeeeechnically, I have actually already done a brief review of Myrta here, but I wanted to do a more in depth review of it since it is such a great polish.

Here is the GOT Polish schedule of events if you would like to follow along or participate.


Remember the rules:

  • The polish you use must be at least a year old.
  • If you haven't been a polishaholic for that long, you can use the oldest polishes you have.
  • The polish should be previously used, but if you're stuck, you can use a polish from your untrieds stack.
  • You can use more than one polish as long as it fits the rules.
I received this mini of Zoya Myrta during Zoya's 2012 Summer Beach and Surf IG promotion.


Color: Red leaning orange with gold and orange shimmers.
Finish: Foil – a polish that has metallic flecks that look like aluminum foil.


Bottle / Brush: Mini tapered bottle and cap - bottle tapers from a fat top to a smaller bottom making it a little harder to hold if you hold your bottles while you paint.  Even though this is the mini version of the bottle, it's still a bit more difficult to hold. The tapered cap actually makes for easier application as it's shorter than most caps, but provides enough length to help guide application without being too wide where you grip it.  The wand and brush are a little short, but they have average application.


Opacity: High – opaque at one to two coats! Here, I've used two coats for photos, but it's really a one coater, which as I've said before is my favorite thing in the world.
Glitter Application: N/A


Consistency: Medium – applies easily and doesn't flood the cuticles.
Overall Ease of Application: Easy – applies well without pooling, dragging, streaking, or balding.  Spreads evenly and smoothly.


Stampability: Stamps but the image is not as saturated. (Please excuse the crappy phone photo, it was the closest camera I had access to at the moment). This is a stamp of Myrta over my Simple Sheer Gelish mani. As you can see, it does in fact stamp, but the image isn't super saturated. I'll definitely need to try it over white to see how to comes out. I've tried over black, and it doesn't show up well at all, sadly.


Dry Time: Quick – dry to the touch without smudging in under 3 minutes.


Overall Thoughts: There are so many things right about this polish. It is super easy to apply - I didn't have to do any cleanup AT ALL. It's a one-coater. It dries quickly. It stamps (not the best stamper, but it does actually stamp). It's a lovely shade of orange with a pretty gold shimmer that doesn't make me look diseased. However, there is one MASSIVE drawback. You see, Myrta's a stainer. I had her on for literally 30 minutes while I took my photos and she left several of my nails a lovely shade of orange. And while that's only one fault, it is a big one. I'm not sure if it will stain on everyone or if it's just the interaction between Myrta and my body chemistry, but I wanted to make sure there was full disclosure. So there you are. Gorgeous polish, superb application, fantastic finish, but a terrible stainer. Womp womp!

You can purchase Zoyas at beauty supply shops like Ulta. However, make sure you're following their Facebook and IG because they often have promotions like the Beach and Surf promotion where you can get free polishes or polishes with drastically reduced prices.


Wednesday, February 26, 2014

Dusty Pinks

So, I've been off of work for the past week and have had all of these grand plans to do stuff around the house, with the blog, and with the polish-making.  But what have I done?  Played with polish.  I've only played with polish...  Yeah.  I have so much I need to do, but I just can't make myself do anything that isn't fun!  Surprise vacation has been fun, but it's time to get myself in gear.  Tonight's post is a couple of pretty, dainty, and dusty pinks: Illamasqua Pink Raindrops and Sonoma Tiny Tangerines.

All polishes were purchased by me.


Pink Raindrops

Color: Dusty dainty pink with silver flakies and pink shimmers.


Finish: Flakie - a polish (creme or jelly) filled with flakes of irregularly shaped glitters.  Some flakies are iridescent or color changing while others are one color but provide added depth.
Bottle / Brush: Rectangular with square top - bottle shape is average for a rectangular bottle.  The top is square, which is a massive pain in the butt when it decides it doesn't want to come off - like with my bottle of Pink Raindrops.  It is short and squat which can make maneuvering a bit difficult.  The wand and brush are both average with average application, but the shape of the top is irritating for me.  It’s probably my least favorite top when it decides to not come off.
Opacity: High – opaque at one to two coats! Here, I've done two coats for the photos.


Glitter Application: Easy – Spreads evenly without much manipulation.
Consistency: Thick – thick or it can be clumpy, but is easily remedied with some polish thinner.
Overall Ease of Application: Hard – applies with some pooling, dragging, streaking, or balding.  Spreads well with manipulation.  Requires quick work to get a smooth result.
Stampability: Not tested for stamping.
Dry Time: Long – dry to the touch with minimal smudging in over 8 minutes.


Overall Thoughts: I'm so so so annoyed with the top on this Illamasqua bottle. I mean, for real. If the square top would come off like it does for my other Illamasquas, or Diors and Chanels, it wouldn't be such a big deal. However, the fact that it doesn't makes it super hard for me to hold and control. I could probably get it off with a pair of pliers, but since I'm going to be adding it to my blog sale, I didn't want to run the risk of damaging the top. Oh well, c'est la vie, I suppose. The first time I tried out Pink Raindrops, it was a thick and clumpy mess. I couldn't get it to cover without pooling and dragging like a matte. The second time I wore it (for these photos), it was a little easier to work with since I knew what I was dealing with. It's one of those polishes where you need to work quickly to get it on the nail and yet wait for a decent amount of time between layers for the polish to dry. I purchased my Pink Raindrops from a blog sale, but you can purchase Illamasquas from Sephora or on their website.


Tiny Tangerines

Color: Pale pink creme with white, pink, aqua, and purple hexes and baby pink hearts.


Finish: Glitter Cr̬me Рglitter in a cr̬me base.
Bottle / Brush: Round bottle (i.e. Seche Vite) – the brush and wand are the standard width and length.  Easy to control and manipulate.
Opacity: Medium – achieves opacity at three to four coats. Here, however, I've worn it as one coat over Pink Raindrops.
Glitter Application: Medium – requires the dab method, but spreads evenly.
Consistency: Fluid – thin but flows easily from the brush.


Overall Ease of Application: Medium – applies well with minimal pooling, dragging, streaking, or balding.  Spreads well without much manipulation.
Stampability: Not designed for stamping.
Dry Time: Medium – dry to the touch with minimal smudging in 3-8 minutes.


Overall Thoughts: Tiny Tangerines was the perfect match for Pink Raindrops. It was an average glitter that had easy removal. The glitters came out of the bottle easily and spread well with the dab method. Dry time was average. This is just one coat over undies, so you can see that the glitter to base ratio is in favor of the glitters. You can purchase Sonoma polishes at her store here. Follow her on Facebook and IG for news and updates.

Tuesday, February 25, 2014

Pretty Little Liars: Enchanted Style

Tonight's Red Coat Tuesday is all about Enchanted.  I used Enchanted Polishes November 2013 with a tape mani accent of October 2013.  I'm only going to review November since it is the predominant polish in this main, so let's check out the info below.

All polishes were purchased by me.


November 2013


Color: Burnt red.
Finish: Holographic – pigment gives polish a rainbow in the sunshine.


Bottle / Brush: Rectangle bottle – ribbed cap that is a little hard on the hands to open if you have sensitive skin.  The wand is the standard length, but the brush is a little too thin to pick up large / shaped glitter without fishing.  The brush's width is also an issue for spreading.  It doesn't fan out and pretty much requires you to dab polishes that are densely packed with glitter.


Opacity: High – opaque at one coat! I used two coats, though, for the photos.
Glitter Application: N/A


Consistency: Medium – applies easily and doesn’t flood the cuticles.
Overall Ease of Application: Easy – applies well without pooling, dragging, streaking, or balding.  Spreads evenly and smoothly.


Stampability: Stamps well with great image transfer. This is a quick and dirty stamp over a bare nail, so it smeared a bit when I used Gelous on top.


Dry Time: Quick – dry to the touch without smudging in under 3 minutes.


Overall Thoughts: This is an amazing red holo. Super easy to apply without any dragging, pooling, or balding that you often get with other holos. It's not the most vibrant red holo I own, but it's still quite beautiful. I also appreciated that it was pretty much a one coater, which is always a giant plus in my book. I really enjoyed using it, and I'm looking forward to properly stamping with it. Let me also mention that October seems to be a one coater as I only used one coat over the red.

You can purchase Enchanted polishes at her store, but these two are unfortunately limited editions. You can typically find them, though, on blog sales or in sales groups. Follow Enchanted's Facebook and IG for news and updates.


Thursday, February 20, 2014

Golden Oldie Thursday Polish: Chevrons

Tonight's Golden Oldie Thursday is all about Chevrons.  Since I am nail art challenged, I decided to use some guides that I received as a Galentine's Day gift from one of my polish besties, Sara, who got them from Nail Vinyls.  I actually also purchased a few other things myself from Nail Vinyls that I'm pretty excited to try!

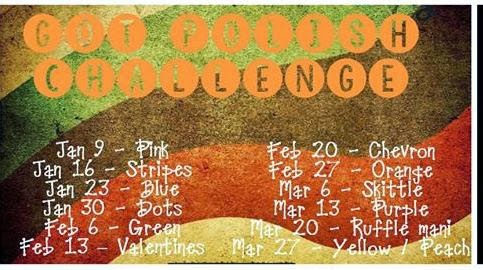
As always, here is the schedule of events if you would like to follow along or participate.


Remember the rules:

  • The polish you use must be at least a year old.
  • If you haven't been a polishaholic for that long, you can use the oldest polishes you have.
  • The polish should be previously used, but if you're stuck, you can use a polish from your untrieds stack.
  • You can use more than one polish as long as it fits the rules.
All polishes were purchased by me.

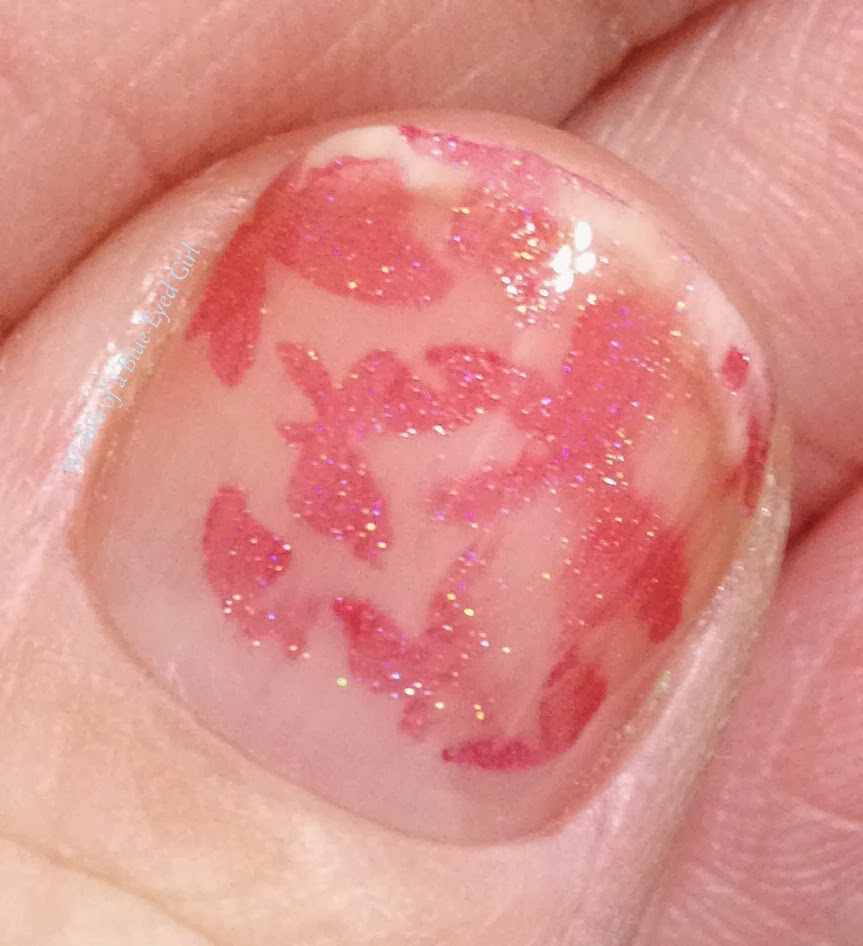
Tonight, I decided that I'd give nail art using soak off gels a shot.  My nails were breaking a bit, and I wanted to use the gels to help get a little better support while they grow out.  It was a pretty time intensive process that I'll describe below.


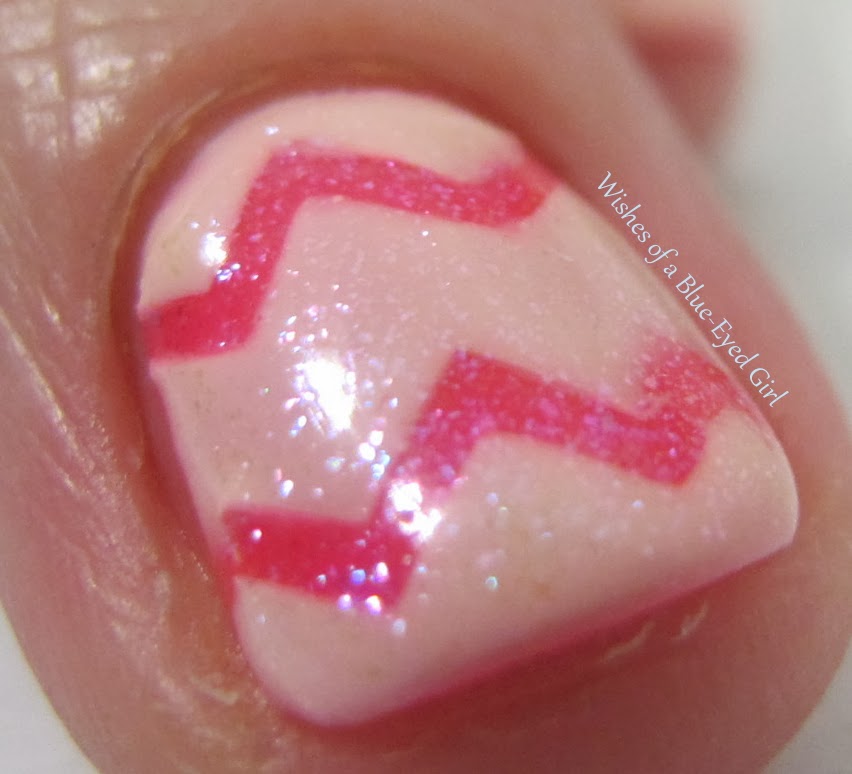
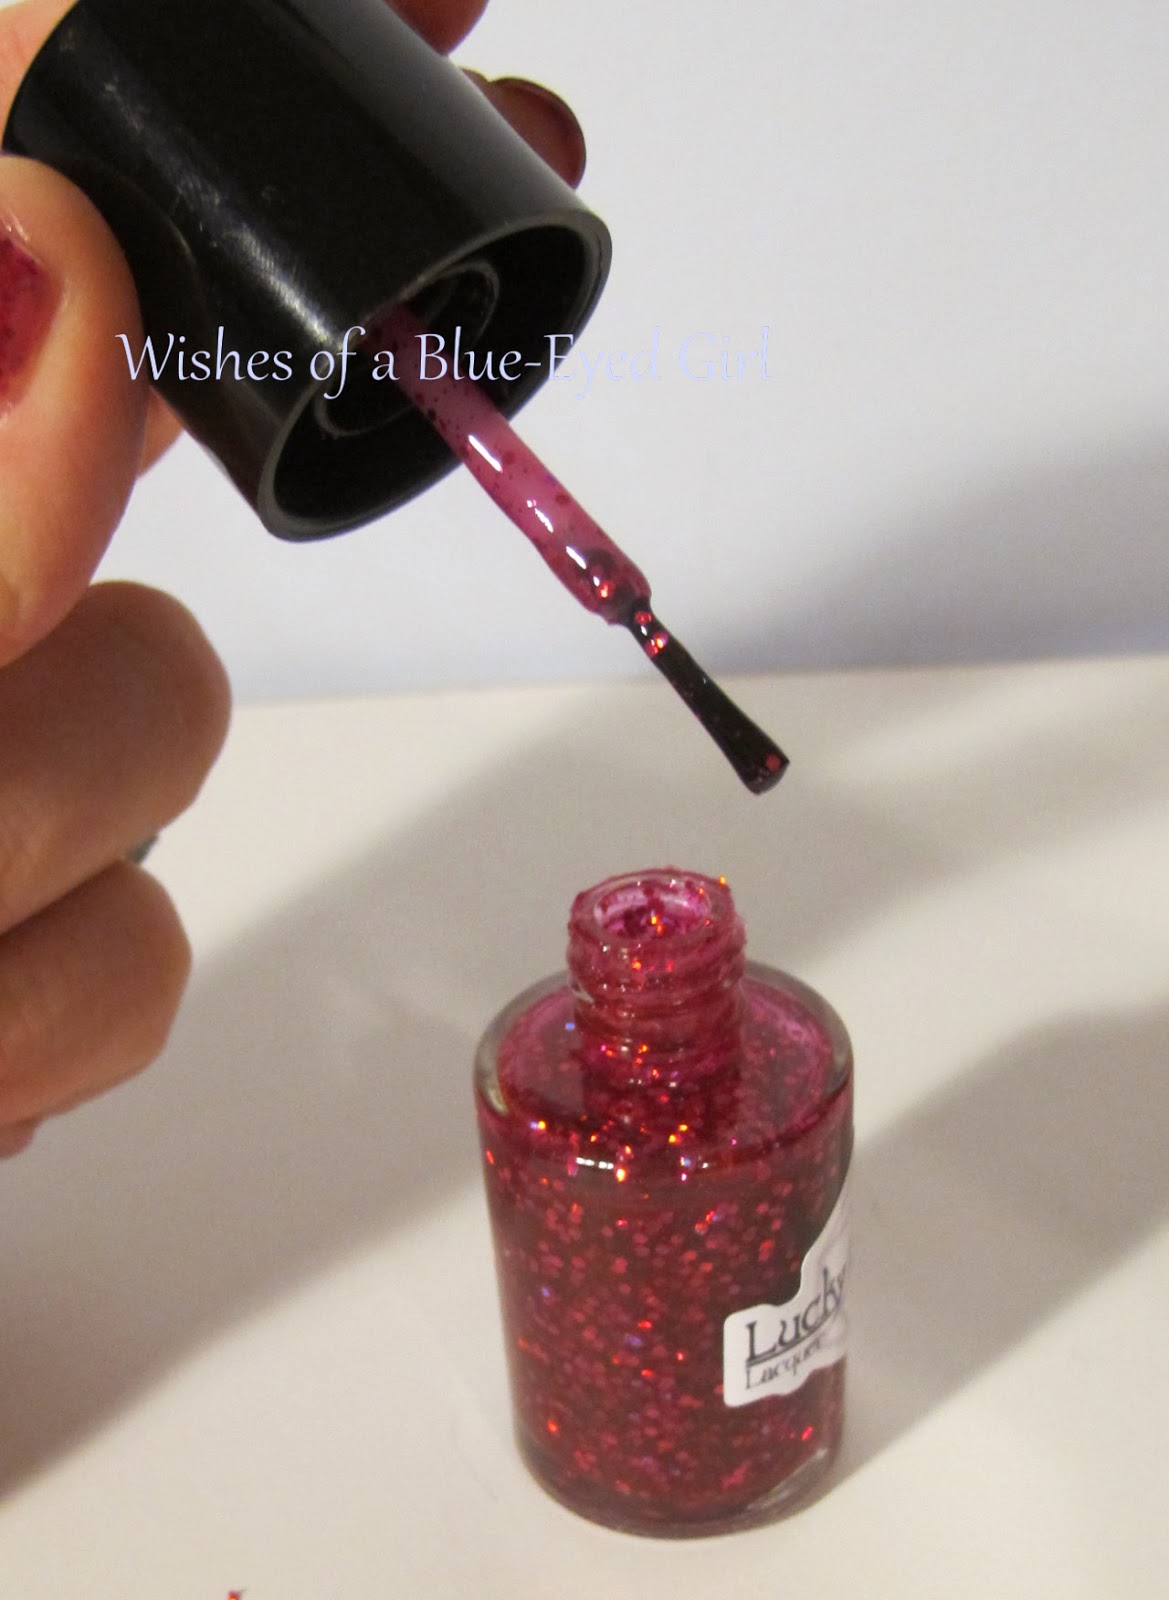
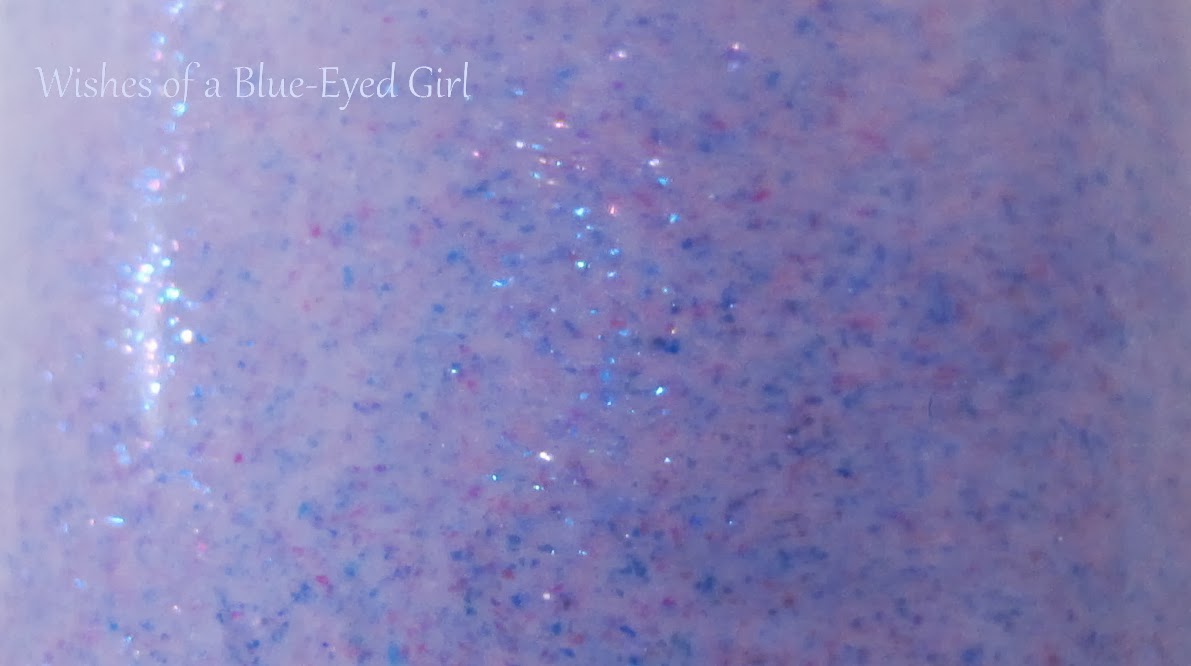
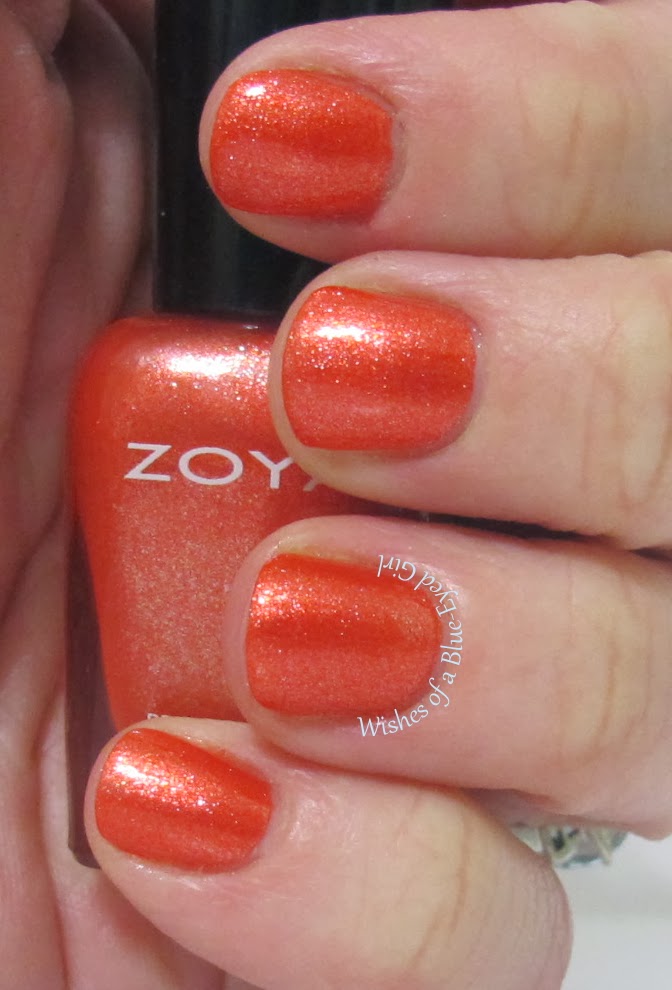
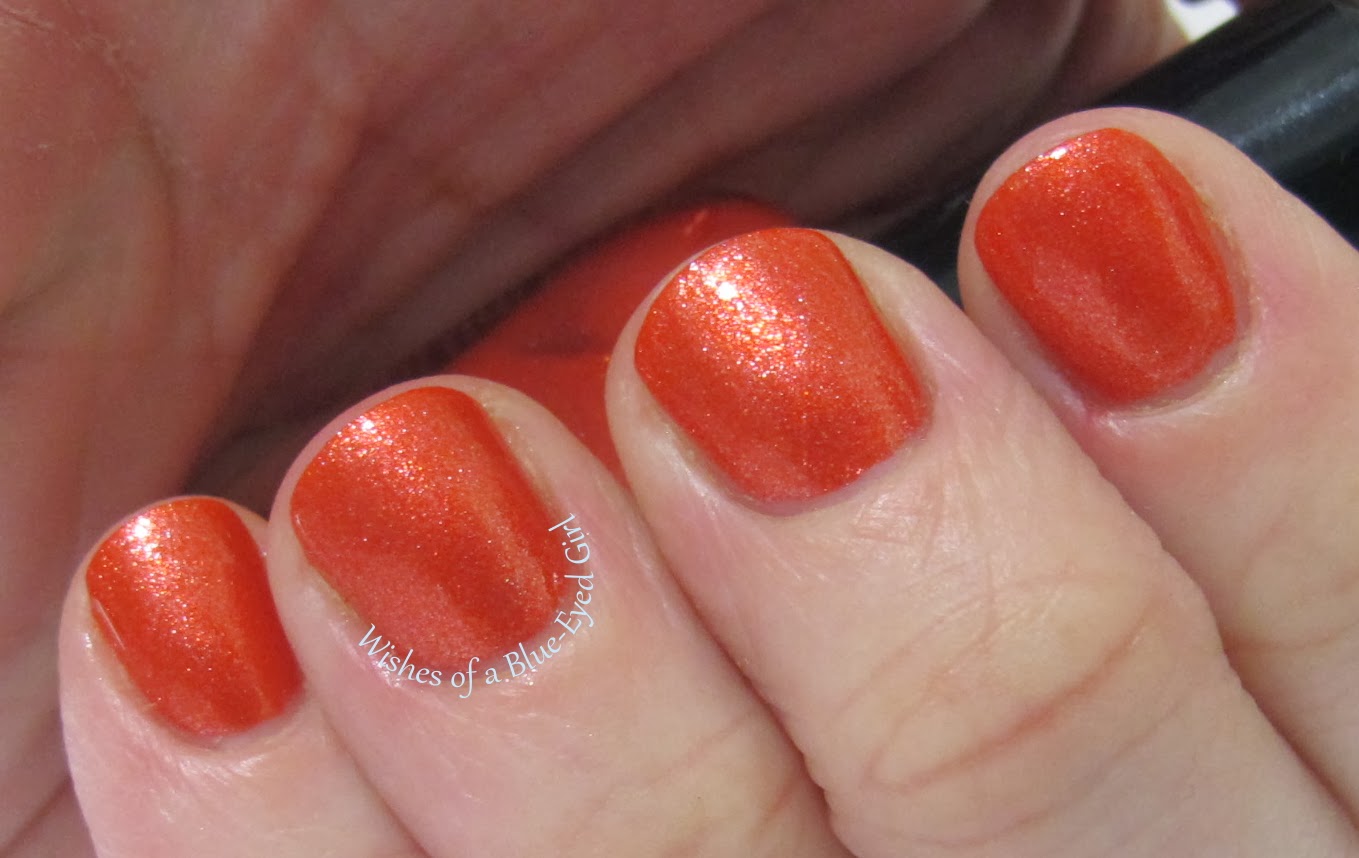
The polishes I used were all from Gelish that I purchased at Sally's at the end of 2011 and early 2012.  I used Shake it Til You Samba, You're So Sweet You're Giving me a Toothache, and Izzy Wizzy Let's Get Busy.

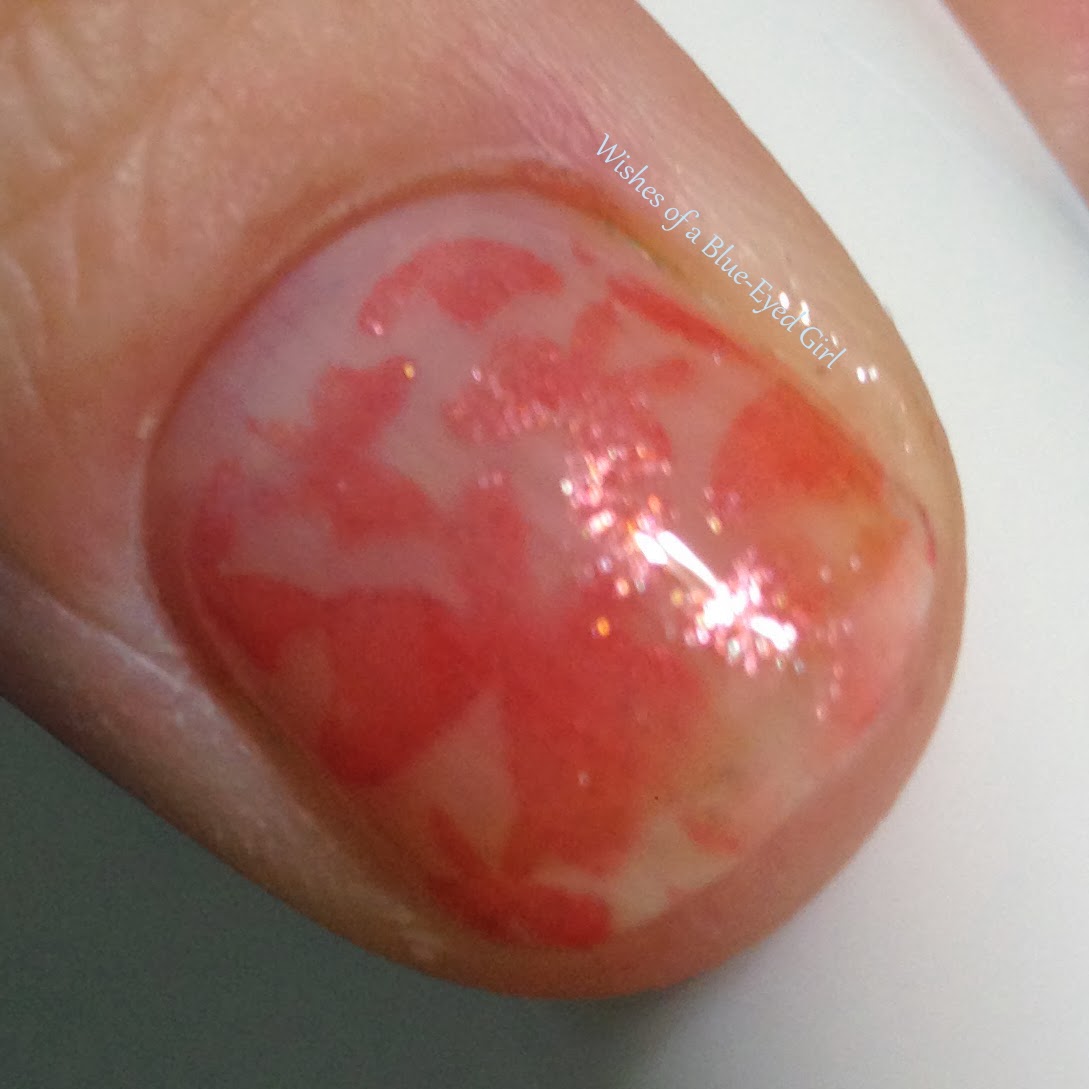
First, I applied one thick coat of Samba and cured it.  Next, I applied the vinyls to the freshly cured gel.  If you do your own SOGs, then you know that the color layers stay slick and tacky untl you've applied the topcoat.  That being said, it was a giant pain in the butt to get the decals to stick.  


After the decals were in place, I topped the mani off with So Sweet.  Unfortunately, because the decals wouldn't stay put, the watery gel just seeped right underneath.  I flash cured each finger for 10 seconds to keep the gel from sliding around, which helped in the spots where the decals were sufficiently affixed to my nail.  


After one coat of So Sweet, I took off the decals to assess the outcome.  As I suspected, bits of So Sweet seeped underneath and cured a bit funky.  I used a bit of acetone and my cuticle nippers to fix the edges a bit and to cut down any parts that were sticking up.


After that first coat, I decided to just free hand the remaining two coats of So Sweet and cleanup a bit as I went along.  I still flash cured it after each finger to ensure that it wouldn't slide around while I finished up my hand.


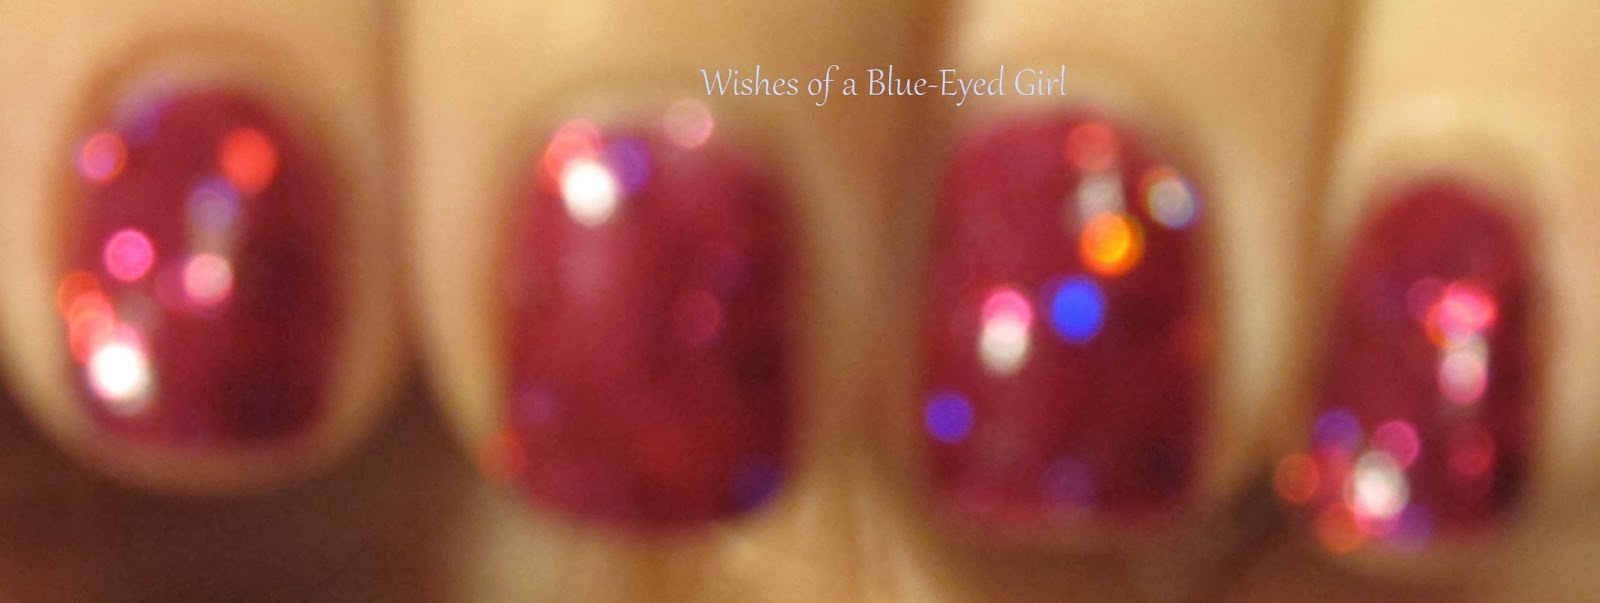
After I finished the art, I topped it all off with Izzy Wizzy and topcoat, cleaned it up, and it was ready to go!  


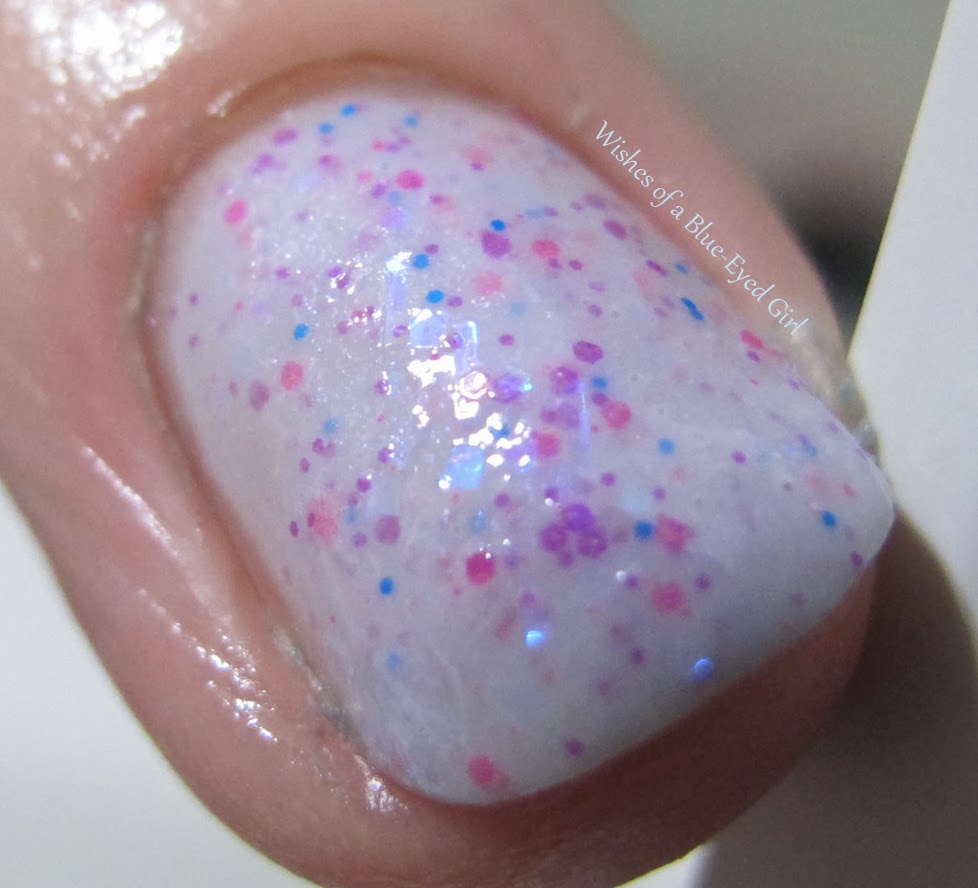
I wasn't that pleased with the outcome after I first finished.  For some reason, it looked weird to me.  Maybe because it reminds me of an Easter egg.  Or maybe it was because my skin was so ridiculously dry after using all of that alcohol and acetone to dehydrate and cleanse my nails.  


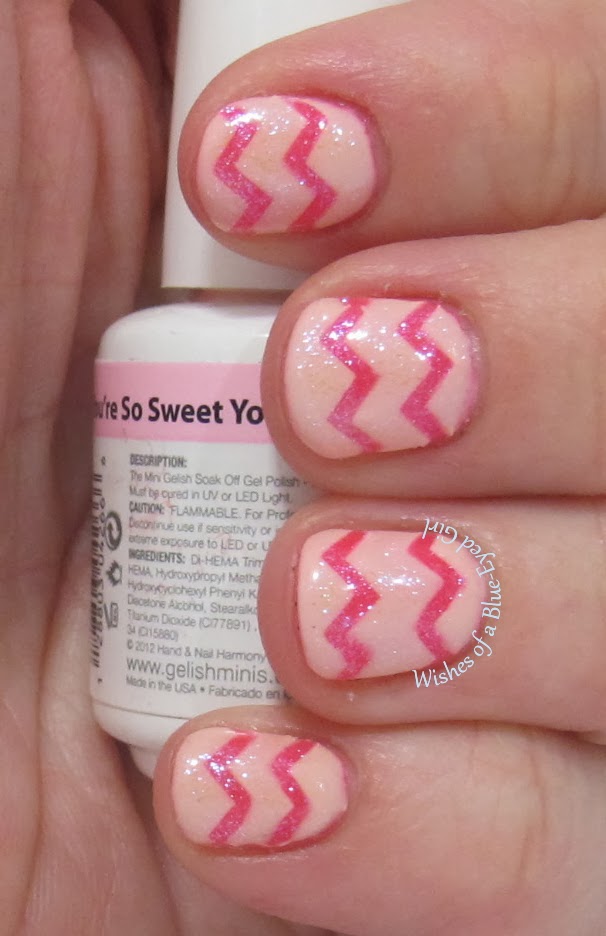
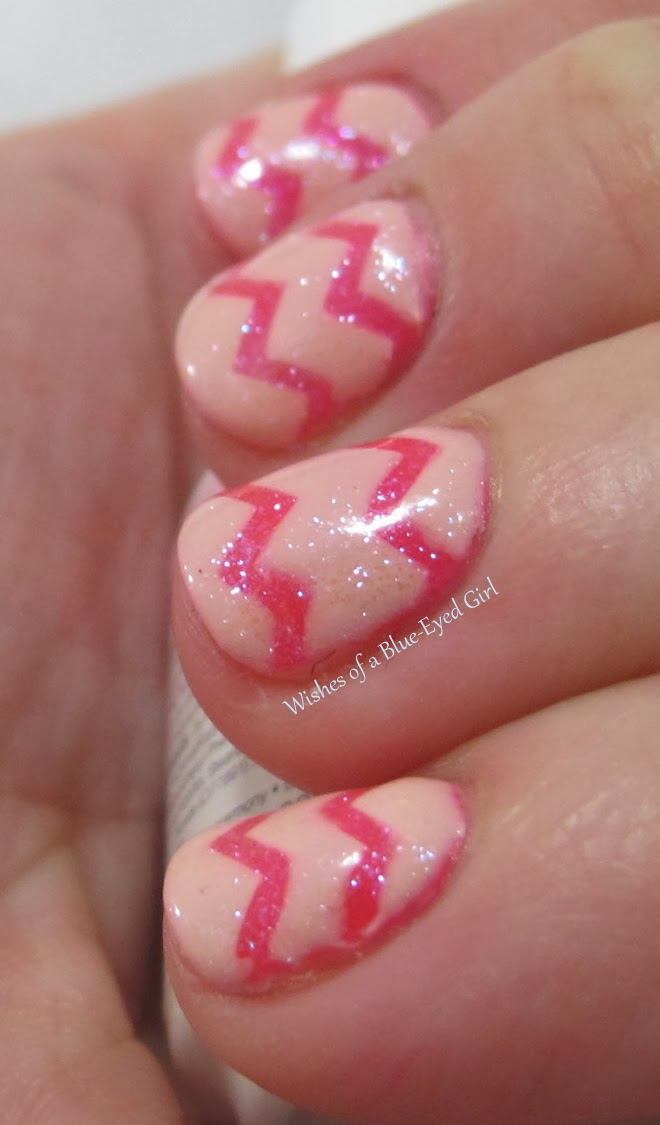
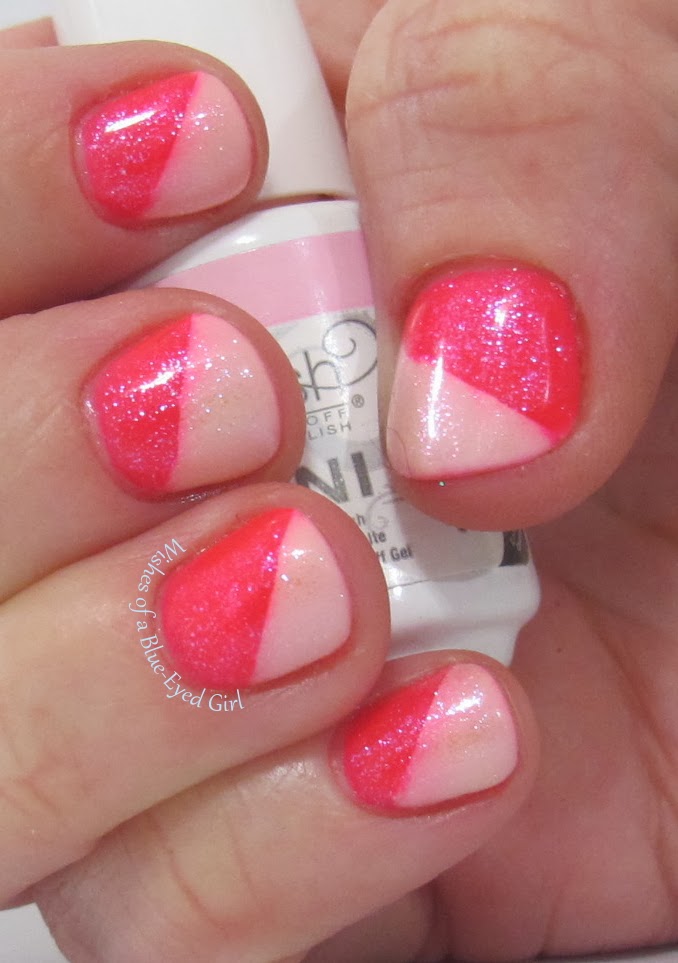
Either way, I decided not to do the same thing with my left hand.  Instead, I attempted a simple diagonal tape mani.  However, I had the same issue with it as I did with the chevrons.  The tape wouldn't stay down, and I had a lot of seepage underneath the tape.  I did my cleanup and went to bed.


When I woke up this morning, I was much more pleased with the outcome.  In fact, I'm actually happy with it and hope it lasts for a week or so before bubbling and lifting.  I tried a few things differently this time by using acetone instead of trying to do a dry cleanup between layers.  We'll see how that effects the wear time.

After all of that, though, I want to make perfectly clear that the Nail Vinyls work AMAZINGLY WELL on regular polish or completed SOGs.  It's just the weirdness of gels in between curing and before finishing the full mani that caused my issues.  However, my nail art noobishness really shows here because I should've used alcohol to remove the tacky layer before trying to add the decals.  That was what was recommended to me today by the super SOG expert Chickettes for the future, so I'm going to try that next time for sure.  Anyway, I really like the vinyls and cannot wait to try out more!

So, what do you think of my mani?  Do you do your own SOGs? 


Wednesday, February 19, 2014

Life is Short...

... And You are Hot.  


One of my all time favorite episodes of any show ever.  And I don't think I'm exaggerating...  Doctor Who episode Don't Blink was the first episode of Doctor Who that I ever saw, and it was just so creepy that it pulled me into the world of Doctor Who for good.  So, when I saw that Lucky 13 had a Doctor Who collection, I just had to own a few - especially Life is Short and You are Hot.  Bear with my photos tonight as they are from last summer with my old setup.  My nails are in rehab again, so I'll be pulling out older photos for a bit.

I purchased this polish.


Color: Bright fuchsia jelly with fuchsia holographic glitters.
Finish: Glitter Jelly – glitter in a colored jelly base.


Bottle / Brush:  Tall round bottles with round cap - the cap is a little awkward to hold because it’s so round but also pretty short.  If you have a hard time holding caps, this bottle type might be difficult for you.  The wand and brush are long and slender allowing you to grab glitters from deeper within the bottle but making it a little more difficult to get the larger glitter pieces to stay on the brush.


Opacity: Medium – achieves opacity at two coats.
Glitter Application: Easy – Spreads evenly without much manipulation.


Overall Ease of Application: Easy – applies well without pooling, dragging, streaking, or balding.  Spreads evenly and smoothly.
Stampability: Not designed for stamping.


Dry Time: Medium – dry to the touch with minimal smudging in 3-8 minutes.


Overall Thoughts:  Overall, I really liked this polish, both for the sentimental factor and because it's just a gorgeous polish.  The jelly was perfectly opaque in two coats with lovely glitter coverage.  The glitter to base ratio was nice, but I would've liked to have seen more variation in sizes of the glitters to give more depth.  Application was super easy and dry time was great.  It didn't require any extra topcoat and was perfectly glossy with one coat of KBShimmer's Clearly on Top.

You can purchase Lucky 13 polishes at her store.  Follow her on Facebook for news and updates.